


View:
Part 1: https://slashqa.hashnode.dev/part-1-initial-setup-cucumber-jvm-via-gradle
Part 2: https://slashqa.hashnode.dev/part-2-configuring-our-gradle-kotlin-dsl-cucumber-jvm-via-gradle
Dependency Injection
Dependency Injection is a design pattern that allows the program to inject an object into another class constructor (or method, field) to easily pass along the object at runtime, instead of explicitly instantiating it at compile time. This lack of a hard dependency on instantiating the object should lead to the de-coupling between the two classes, and hopefully, simpler code.
Why Do We Need It?
In Cucumber automation there is no way out of the box to share state across steps that reside in different classes (Frameworks like Serenity will handle this for you). We'll use dependency injection to store the state for the lifetime of our scenario.
Of course, a word of caution is that this session data should only ever last the scenario lifetime, you don't want to share state across scenarios ever, which can lead to inflexible tests that cannot be run in isolation.
Cucumber has a few different ways of achieving dependency injection, including Guice, Spring, Weld etc, but we are going to use Pico Container for this example.
Adding the Dependency
In your build.gradle.kts file, under dependencies, add the following two lines:
...
testImplementation("io.cucumber:cucumber-picocontainer:7.11.2") // added for DI
testImplementation("io.cucumber:cucumber-junit:7.11.2") // added for assertions
The first dependency is adding the Pico Container framework that we can use for dependency injection. The second, we'll use for assertions. It isn't needed for dependency injection to work, but more so to prove everything is working as needed. We'll also use it more as we move onto the REST Assured section in an upcoming post.
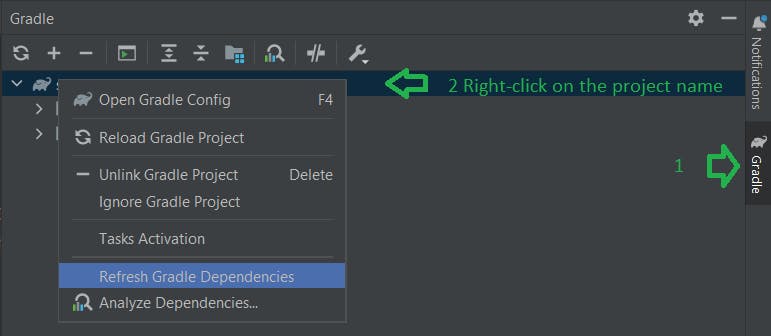
Ensure you refresh your dependencies manually if they don't automatically start resolving:
The Code
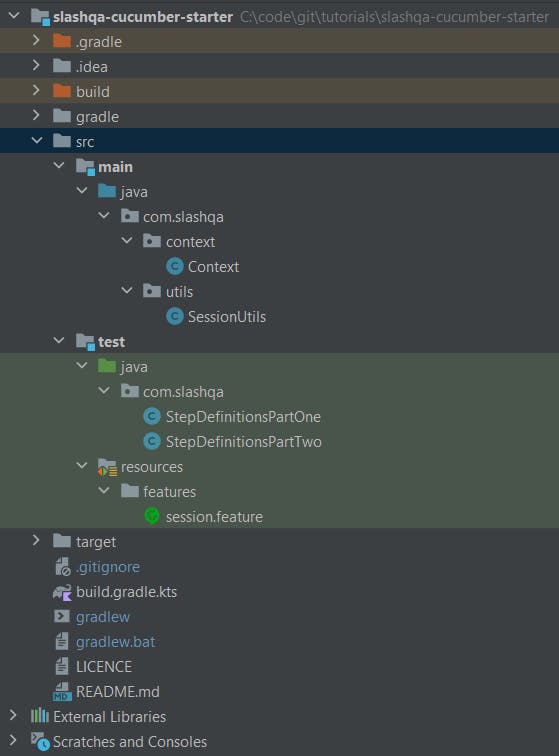
OK, now create the following structure (each is a class) in your project under each of /src/main and /src/test then we'll tackle each class at a time. Reminder, use a package name that works for you, again I am using com.slashqa.
/src/main
/src/main/java/com.slashqa/context/Context
The Context class is an intermediary class and it:
injects the SessionUtils object
makes it easier to reference the session directly through a method call. This is less useful in this simple example where we are just handing the session object, but later when we extend this project to support a Web Driver instance it becomes more valuable. You can build a project without this class, I'll include that information at the end.
package com.slashqa.context;
import com.slashqa.utils.SessionUtils;

public class Context {
    private SessionUtils mySession;

    public Context(SessionUtils theSession){
        mySession = theSession;
    }

    public SessionUtils getSession(){
        return mySession;
    }
}
/src/main/java/com.slashqa/utils/SessionUtils
This is the class that does the heavy lifting for anything session related to our test project. This is where we create the HashMap to store session data and then have relevant methods to put/get items into that HashMap. We also have a few other helper methods for removing and clearing the session which will be used in later editions as we extend this.
You'll notice that we have multiple methods for putting an object of a different type (String, Integer, Boolean), but only one for getting. This is a personal choice as I like to handle the conversion to a specific type as part of a cast on the get.
package com.slashqa.utils;

import java.util.HashMap;

public class SessionUtils {

    private HashMap<Object, Object> session;
    public static final String TEST_KEY="testKey";

    public SessionUtils(){
        session = new HashMap<>();
    }

    public void put(String key, String value){
        session.put(key, value);
    }

    public void put(String key, int value){
        session.put(key, value);
    }

    public void put(String key, boolean value){
        session.put(key, value);
    }

    public Object get(String key){
        return session.get(key);
    }

    public Boolean contains(String key){
        return session.containsKey(key);
    }

    public void remove(String key){
        session.remove(key);
    }

    public void clear(){
        session.clear();
    }

}
/src/test/java
/src/test/java/com.slashqa/StepDefinitionsPartOne
OK, this is the first of our steps classes. This is a trivial example to be sure, just demonstrating storing some session data, but important nonetheless.
package com.slashqa;
import com.slashqa.context.Context;
import com.slashqa.utils.SessionUtils;

import io.cucumber.java.en.Given;

public class StepDefinitionsPartOne extends Context {
    public StepDefinitionsPartOne(SessionUtils session) {
        super(session);
    }

    @Given("I have {string} stored in my session")
    public void iHaveStringStoredInMySession(String stepValue){
        getSession().put(SessionUtils.TEST_KEY, stepValue);
    }
}
/src/test/java/com.slashqa/StepDefinitionsPartTwo
A class for checking the value we set in the previous step.
package com.slashqa;
import com.slashqa.context.Context;
import com.slashqa.utils.SessionUtils;
import io.cucumber.java.en.Then;
import static org.junit.Assert.assertEquals;


public class StepDefinitionsPartTwo extends Context {
    public StepDefinitionsPartTwo(SessionUtils session) {
        super(session);
    }

    @Then("the user verifies that the string stored in the session is {string}")
    public void verifyVariable(String expectedValue){
        assertEquals(expectedValue, getSession().get(SessionUtils.TEST_KEY));
    }
}
/src/test/resources
Finally, remove the previous com.slashqa/features folder under /src/test/resources.
Then, create:
a folder named features, so the path will be
/src/test/resources/featuresa feature file called
session.featurewith the following contents:
@dev

Feature: SessionTest

  Scenario: As a user, we can verify that our session state across steps is working
    Given I have "testString" stored in my session
    Then the user verifies that the string stored in the session is 'testString'
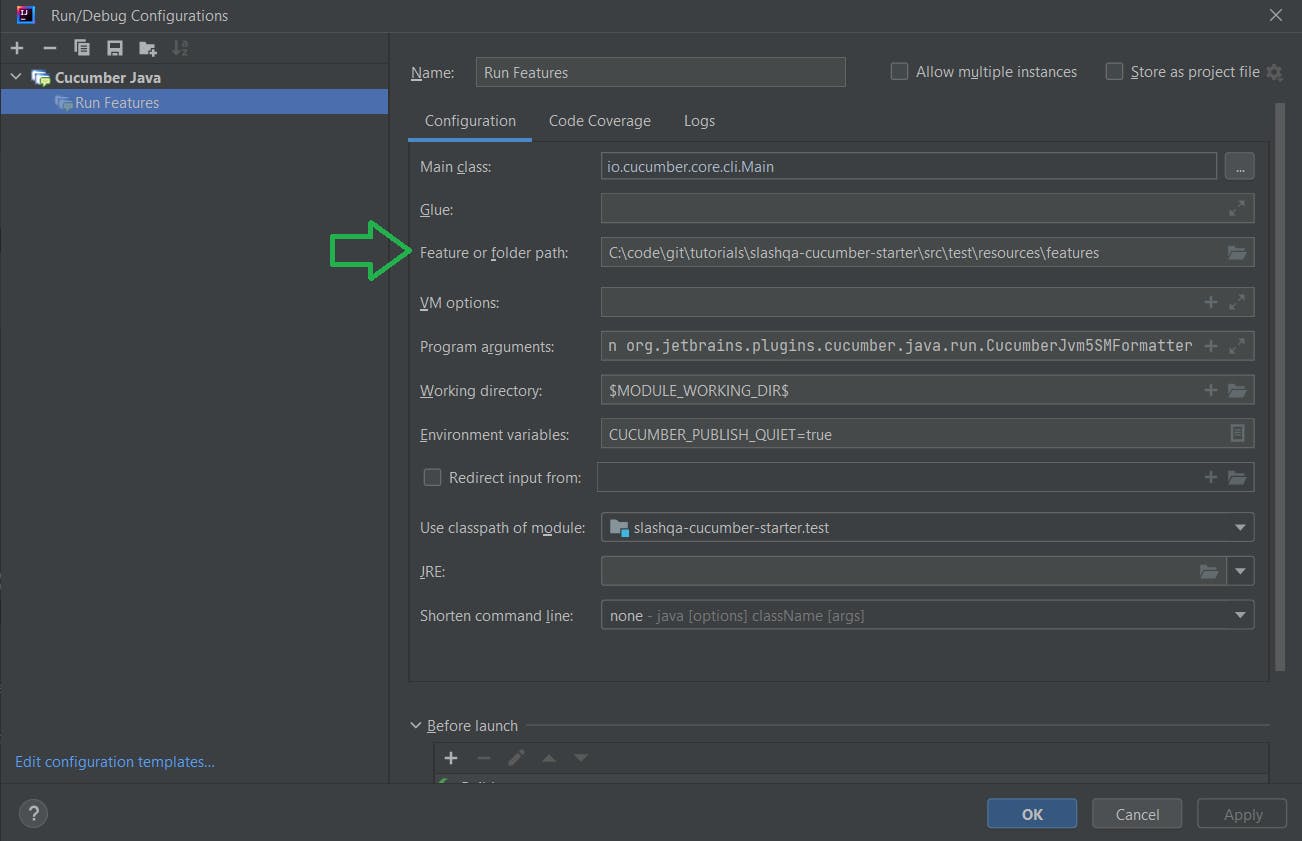
Be sure to update the "Feature of folder path" in your Run/Debug configuration accordingly:
Now, let's run it either through Cucumber for Java or gradlew:
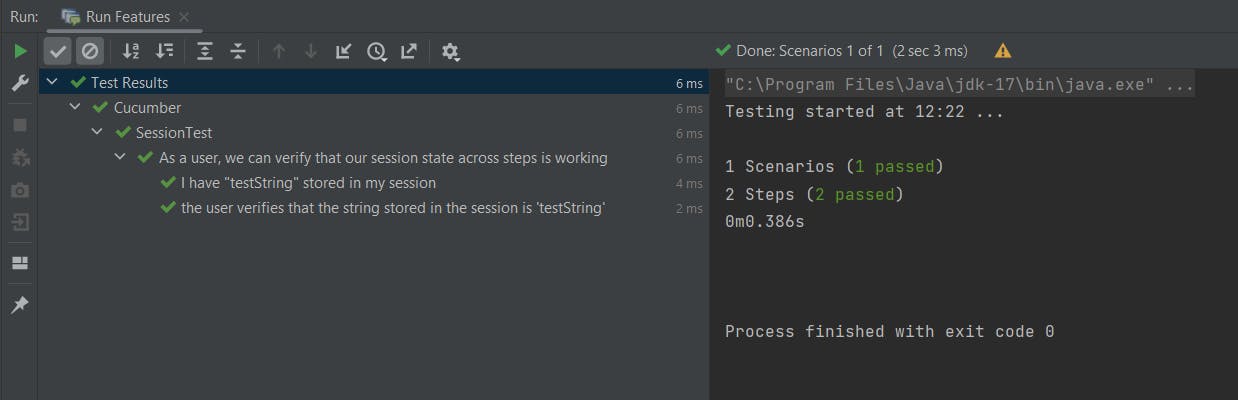
We can see that our string from the first class has been successfully added into the session and persisted across into when we need it in the second class.
Wrapping up
OK, that concludes this series on setting up a new test automation framework using Cucumber + Gradle with dependency injection.
The full source can be seen on my GitHub account:
https://github.com/slashqa/slashqa-cucumber-starter
Please either star the project or add a comment below if it helps you. If you run into issues, add a comment and I may try to help if I can when time allows.
Without the Intermediary "Context" class
As I mentioned above, you can design this without the Context class by creating an instance variable of the SessionUtils type and assigning it to the injected SessionUtils object. This reduces the need to have to extend every class with Context.
/src/test/java/com.slashqa/StepDefinitionsPartOne
public class StepDefinitionsPartOne {
    SessionUtils session; // <-- we set this below
    public StepDefinitionsPartOne(SessionUtils sessionUtils) {
        super();
        session = sessionUtils;
    }

    @Given("I have {string} stored in my session")
    public void iHaveStringStoredInMySession(String stepValue){
        session.put(SessionUtils.TEST_KEY, stepValue);
    }
}
/src/test/java/com.slashqa/StepDefinitionsPartTwo
public class StepDefinitionsPartTwo {
    SessionUtils session;
    public StepDefinitionsPartTwo(SessionUtils sessionUtils) {
        super();
        session = sessionUtils;
    }

    @Then("the user verifies that the string stored in the session is {string}")
    public void verifyVariable(String expectedValue){
        assertEquals(expectedValue, session.get(SessionUtils.TEST_KEY));
    }
}
However, as I mentioned above when adding WebDriver support I like to be able to call the driver instance directly, which is what this allows, among other shortcut references.
To see this in action, take a look at the "no-context" branch in the Git project linked above.
This is educational only, no guarantees or support are offered or implied with this framework. Use at your own risk.