View:
Part 1: https://slashqa.hashnode.dev/part-1-initial-setup-cucumber-jvm-via-gradle
Part 3: https://slashqa.hashnode.dev/part-3-getting-dependency-injection-working-cucumber-jvm-via-gradle
Now, let's start getting into the nitty gritty of customising our Cucumber project.
First, we need to customise our build.gradle.kts DSL (Domain Specific Language). Remove everything under the Dependencies block, then add in just the two cucumber dependencies for now (you can get the latest version from the Maven Repo):
//
dependencies {
  testImplementation("io.cucumber:cucumber-java:7.11.2")
}
We'll add more dependencies as we go along, but this is all we need for now.
Ensure your script sets both the local maven cache and maven central for the repositories:
// defines where Gradle should 'look' to pull dependencies from
repositories {
    mavenLocal()
    mavenCentral()
}
Next, we'll need to register the cucumber runtime so we can use it to build the classpath as part of the JavaExec command:
// add dependency for building the classpath
configurations {
    register("cucumberRuntime") {
        extendsFrom(testImplementation.get())
    }
}
Lastly, we'll add our task and function that runs Cucumber CLI via the JavaExec command, with a few arguments:
tasks {
    val runTest by registering {
        doLast {
            runCucumber()
        }
    }
}


fun runCucumber(){
    javaexec {
        val main = "io.cucumber.core.cli.Main"
        val cucumberRuntime = configurations["cucumberRuntime"]
        val threads = Runtime.getRuntime().availableProcessors().div(2).toString() ?: "1"
        mainClass.set(main)
        classpath = cucumberRuntime + sourceSets.main.get().output + sourceSets.test.get().output

        args = mutableListOf(
                "--threads", threads,
                "--plugin", "pretty",
                "--plugin", "html:target/cucumber-report.html"
        )
        args(args)

        // Set any System Properties
    }
}
You'll notice in the args above we haven't specified the --glue parameter. It is an optional parameter and since this project is quite simple, it will just use the annotated classes by default under the one package.
If we wanted to split our step definitions across multiple packages, then we would need to use multiple glue parameters, for example:
// optional, notice the two new --glue parameters
        args = mutableListOf("--threads", threads,
                "--plugin", "pretty",
                "--plugin", "html:target/cucumber-report.html",
                "--glue", "io.cucumber.skeleton",
                "--glue", "com.slashqa"
        )
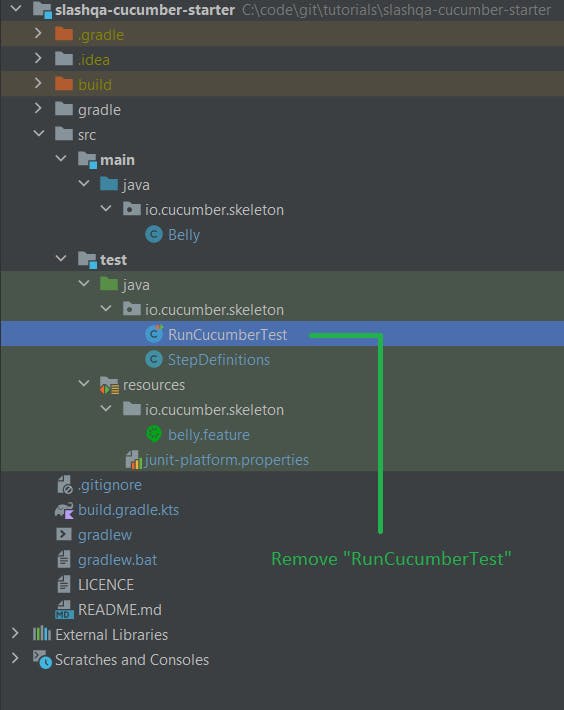
Now, you can remove the src/test/java/io.cucumber.skeleton/RunCucumberTest.java class. We'll use the Gradle task to run our tests via the command line (or Cucumber for Java in the IDE).

./gradlew runTest
Booyah! It works:

Tidying Up
Now, let's rename our packages (select, right-click, Refactor > Rename or SHFT+F6 on Windows) under:
src/main/javaandsrc/test/java.
We'll also create a folder named features under the src/test/resources folder. Select package names that work for you. I'll be using com.slashqa.
Finally, we'll remove the junit-platform.properties file.
Now our structure is along the lines of the:

Turning Off the Extra Debug Console Output
You may have noticed in our console output above, quite a large amount of extra output:

I haven't had much luck adding either (or both) the files it mentions under the "Disable" section with the cucumber.publish.quiet=true flag, so we'll turn it off via an environment variable in our Kotlin script instead.
In the runCucumber task, add the following under the existing classpath variable:
fun runCucumber(){
    javaexec {
        val main = "io.cucumber.core.cli.Main"
        val cucumberRuntime = configurations["cucumberRuntime"]
        val threads = Runtime.getRuntime().availableProcessors().div(2).toString() ?: "1"
        mainClass.set(main)
        classpath = cucumberRuntime + sourceSets.main.get().output + sourceSets.test.get().output
        //==========| Add the following line |===========
        environment("CUCUMBER_PUBLISH_QUIET", true)
...
Now when you run the task, it should look like something along the lines of:

While we are here, set the same variable in the IntelliJ Run Configuration as well:

Running with Cucumber for Java
With all the changes above, we should probably check a few things in our Run Configuration for when we want to run/debug a feature file in the IDE. In IntelliJ, go to Run > Edit Configurations. Here:
Ensure the Feature or folder path is correct
Update or remove any "glue" parameters

Next, we'll add some proper code to handle sharing state across steps via dependency injection and improve our Gradle task by adding tag support, handing properties etc.

